If you’ve ever wanted to add real-time location tracking to your Arduino project, the NEO-6M GPS module with Arduino is hands down the easiest and most reliable way to do it. Whether you’re building a vehicle tracker, a drone, a hiking logger, or a geofencing device, this tiny module punches well above its weight class.
In this guide, you’ll get everything — pinout, wiring, the right libraries, working code, a comparison table, common mistakes, and real project ideas. No fluff, just what you actually need.
Table of Contents
What Is the NEO-6M GPS Module?
The NEO-6M is a compact GPS receiver manufactured by u-blox, a Swiss company known for making some of the most reliable GNSS chips in the world. The NEO-6M GPS module with Arduino has become the go-to choice in the maker community because it’s affordable (usually under $5), easy to wire, and works out of the box with simple serial communication.
It receives signals from GPS satellites orbiting Earth, calculates your latitude, longitude, altitude, speed, and time, then sends that data as NMEA sentences over a UART interface — which Arduino reads perfectly.
Key Specifications
| Parameter | Value |
|---|---|
| Chipset | u-blox NEO-6M |
| Supply Voltage | 3.3V – 5V |
| Default Baud Rate | 9600 bps |
| Update Rate | Up to 5 Hz |
| Horizontal Accuracy | 2.5 m CEP |
| Cold Start TTFF | ~27 seconds |
| Hot Start TTFF | ~1 second |
| Communication | UART (TTL Serial) |
| Operating Temperature | –40°C to +85°C |
| Channels | 50 |
| Sensitivity (Tracking) | –161 dBm |
| Built-in EEPROM | Yes |
| Antenna | External ceramic patch antenna (included) |
NEO-6M GPS Module Pinout
The NEO-6M GPS module with Arduino uses only 4 pins for basic operation:
| Pin | Label | Description |
|---|---|---|
| 1 | VCC | Power supply (3.3V or 5V) |
| 2 | GND | Ground |
| 3 | TX | Transmit data → Connect to Arduino RX |
| 4 | RX | Receive data → Connect to Arduino TX |
There are also TIMEPULSE (PPS) and other breakout pads on some variants, but for standard use with Arduino, only these four matter.
Components You Need
Before wiring the NEO-6M GPS module with Arduino, gather the following:
- Arduino Uno, Nano, or Mega (any will work)
- NEO-6M GPS module with antenna
- 4 jumper wires (male-to-female)
- USB cable for programming
- Optional: breadboard
That’s genuinely it. No resistors, no voltage dividers needed if you’re using a 5V Arduino — the module handles it internally on most breakout boards.
Also Read About GENERAL AI GUIDES!
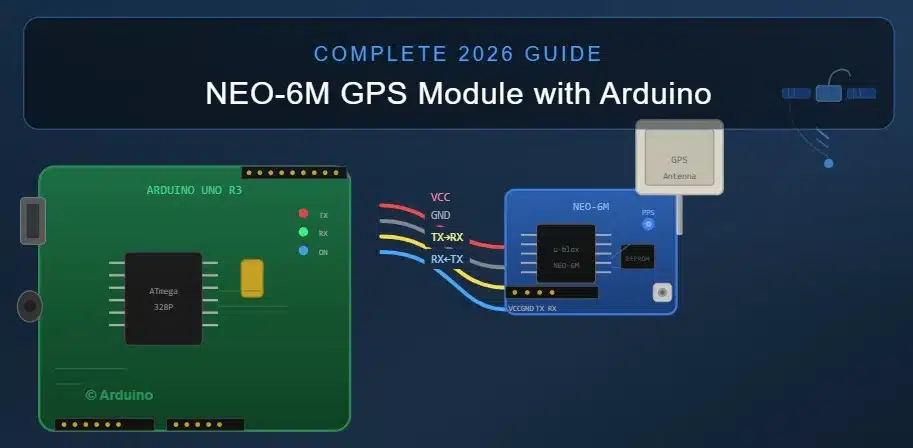
Wiring the NEO-6M GPS Module with Arduino
This is the most important step. A wrong connection will either fry the module or give you no data. Here’s the correct wiring for the NEO-6M GPS module with Arduino Uno:
| NEO-6M Pin | Arduino Uno Pin |
|---|---|
| VCC | 5V |
| GND | GND |
| TX | Pin 4 (Software Serial RX) |
| RX | Pin 3 (Software Serial TX) |
Why not use Hardware Serial (pins 0 and 1)? Because Arduino Uno uses those pins for USB communication with your computer. If you connect the GPS there, you’ll get garbage in the Serial Monitor and won’t be able to upload code while the GPS is wired. Using SoftwareSerial on pins 3 and 4 keeps everything clean.
For Arduino Mega, you have extra hardware serial ports (Serial1, Serial2, Serial3), so you can wire TX to Pin 19 and RX to Pin 18 and use Serial1 directly — no SoftwareSerial needed. This gives more reliable communication at higher baud rates.
Installing the Required Libraries
To parse NMEA data from the NEO-6M GPS module with Arduino, you need two libraries:
1. TinyGPS++ This is the best GPS parsing library available for Arduino. Developed by Mikal Hart, it makes extracting latitude, longitude, speed, date, and time dead simple.
Install it via Arduino IDE: Sketch → Include Library → Manage Libraries → Search "TinyGPSPlus" → Install
Or download directly from the TinyGPS++ GitHub repository.
2. SoftwareSerial This is included by default in the Arduino IDE, so no installation needed.
Also Check : Best AI Subreddits 2026: Top 10 Communities Every AI Enthusiast Must Follow
Arduino Code for NEO-6M GPS Module
Here is a complete, tested sketch for reading GPS data using the NEO-6M GPS module with Arduino Uno:
cpp
#include <TinyGPSPlus.h>
#include <SoftwareSerial.h>

// GPS module TX → Arduino Pin 4
// GPS module RX → Arduino Pin 3
SoftwareSerial gpsSerial(4, 3); // RX, TX

TinyGPSPlus gps;

void setup() {
  Serial.begin(9600);       // Serial Monitor
  gpsSerial.begin(9600);    // GPS module baud rate
  Serial.println("NEO-6M GPS Module with Arduino - Initializing...");
}

void loop() {
  while (gpsSerial.available() > 0) {
    gps.encode(gpsSerial.read());
  }

  if (gps.location.isUpdated()) {
    Serial.print("Latitude  : ");
    Serial.println(gps.location.lat(), 6);

    Serial.print("Longitude : ");
    Serial.println(gps.location.lng(), 6);

    Serial.print("Altitude  : ");
    Serial.print(gps.altitude.meters());
    Serial.println(" meters");

    Serial.print("Speed     : ");
    Serial.print(gps.speed.kmph());
    Serial.println(" km/h");

    Serial.print("Satellites: ");
    Serial.println(gps.satellites.value());

    Serial.print("Date (DD/MM/YYYY): ");
    Serial.print(gps.date.day());
    Serial.print("/");
    Serial.print(gps.date.month());
    Serial.print("/");
    Serial.println(gps.date.year());

    Serial.print("Time (UTC): ");
    Serial.print(gps.time.hour());
    Serial.print(":");
    Serial.print(gps.time.minute());
    Serial.print(":");
    Serial.println(gps.time.second());

    Serial.println("---------------------------");
  }
}
```

Open the Serial Monitor at **9600 baud**, take the module outside or near a window, and wait up to 30 seconds for a first fix. Once locked, you'll see coordinates scrolling in real time.

---

## Understanding NMEA Sentences

When you use the **NEO-6M GPS module with Arduino** without a parsing library, the raw output looks like this:
```
$GPGGA,123519,4807.038,N,01131.000,E,1,08,0.9,545.4,M,46.9,M,,*47
$GPRMC,123519,A,4807.038,N,01131.000,E,022.4,084.4,230394,003.1,W*6A
$GPVTG,054.7,T,034.4,M,005.5,N,010.2,K*48
These are called NMEA 0183 sentences. The TinyGPS++ library handles all of this parsing automatically. But knowing what they mean is useful:
- $GPGGA — Fix data: latitude, longitude, altitude, satellites in use
- $GPRMC — Recommended minimum: coordinates, speed, date, time
- $GPVTG — Velocity: speed over ground, course
- $GPGSV — Satellites in view
- $GPGSA — Active satellites, DOP values
Comparison Table: NEO-6M vs Other Popular GPS Modules
| Feature | NEO-6M | NEO-7M | NEO-M8N | SIM28 |
|---|---|---|---|---|
| Price (approx.) | ~$4–6 | ~$8–12 | ~$15–25 | ~$5–8 |
| GNSS Systems | GPS only | GPS + SBAS | GPS+GLONASS+Galileo | GPS only |
| Update Rate | 5 Hz | 10 Hz | 10 Hz | 1 Hz |
| Cold Start TTFF | ~27 sec | ~26 sec | ~26 sec | ~35 sec |
| Accuracy (CEP) | 2.5 m | 2.0 m | 2.0 m | 2.5 m |
| Arduino Compatibility | ✅ Excellent | ✅ Excellent | ✅ Excellent | ✅ Good |
| Power Consumption | ~45 mA | ~45 mA | ~25 mA | ~42 mA |
| EEPROM | Yes | Yes | Yes | No |
| Best For | Beginners | Mid-level | Advanced/Drones | Budget builds |
For most beginners, the NEO-6M GPS module with Arduino is the sweet spot of price, availability, and ease of use. If you need multi-constellation support or higher accuracy, stepping up to the NEO-M8N is worth it.
Getting a GPS Fix — Tips That Actually Work
One of the most common complaints with the NEO-6M GPS module with Arduino is “I’m not getting a fix.” Here’s what actually helps:
1. Go outside or near a large window GPS signals don’t penetrate concrete or metal roofs. Even a window facing the sky makes a huge difference.
2. Wait for a cold start The first time you power on the NEO-6M GPS module with Arduino, it has no almanac data. It needs to download orbital data from satellites, which takes 27–45 seconds in open sky. After that first fix, subsequent startups are much faster because the EEPROM saves the almanac.
3. Attach the antenna properly The ceramic patch antenna must be facing upward (toward the sky). It has a ground plane underneath it. If the antenna is flipped or sideways, signal quality drops dramatically.
4. Avoid interference Keep the GPS antenna away from motors, ESP8266/ESP32 Wi-Fi modules, and high-frequency oscillators. RF noise kills GPS sensitivity.
5. Check the blue LED (on most breakout boards) Most NEO-6M GPS module with Arduino breakout boards have a small LED. It blinks once per second when the module has a fix. If it’s not blinking, the module hasn’t locked onto satellites yet.
Saving GPS Coordinates to SD Card
For a GPS logger project using the NEO-6M GPS module with Arduino, you can add an SD card module and save coordinates to a CSV file:
cpp
#include <TinyGPSPlus.h>
#include <SoftwareSerial.h>
#include <SD.h>
#include <SPI.h>

SoftwareSerial gpsSerial(4, 3);
TinyGPSPlus gps;
File logFile;

void setup() {
  Serial.begin(9600);
  gpsSerial.begin(9600);
  SD.begin(10); // CS pin
  logFile = SD.open("gpslog.csv", FILE_WRITE);
  if (logFile) {
    logFile.println("Latitude,Longitude,Altitude,Speed,Satellites,Date,Time");
    logFile.close();
  }
}

void loop() {
  while (gpsSerial.available()) gps.encode(gpsSerial.read());

  if (gps.location.isUpdated()) {
    logFile = SD.open("gpslog.csv", FILE_WRITE);
    if (logFile) {
      logFile.print(gps.location.lat(), 6); logFile.print(",");
      logFile.print(gps.location.lng(), 6); logFile.print(",");
      logFile.print(gps.altitude.meters()); logFile.print(",");
      logFile.print(gps.speed.kmph());      logFile.print(",");
      logFile.print(gps.satellites.value()); logFile.print(",");
      logFile.print(gps.date.value());      logFile.print(",");
      logFile.println(gps.time.value());
      logFile.close();
    }
  }
}
This is the foundation of a real GPS data logger. You can later import the CSV into Google Earth and visualize your entire route.
Changing the Baud Rate of NEO-6M
The default baud rate of the NEO-6M GPS module with Arduino is 9600 bps. For faster data throughput (especially at 5 Hz update rate), you might want to switch to 57600 or 115200. You can do this by sending a UBX protocol command:
cpp
// Send to GPS: Change baud rate to 57600
gpsSerial.print("$PUBX,41,1,0007,0003,57600,0*2B\r\n");
delay(100);
gpsSerial.begin(57600);
However, for most NEO-6M GPS module with Arduino projects, 9600 baud at 1 Hz is completely sufficient.
Real-World Project Ideas
The NEO-6M GPS module with Arduino opens up a wide range of practical applications:
- Vehicle GPS Tracker — Combine with a GSM module (SIM800L) to send live coordinates via SMS
- GPS Data Logger — Log hiking/cycling routes to SD card, import into Google Maps
- Drone/UAV Navigation — Feed GPS data into a flight controller
- Geofencing Alarm — Trigger a buzzer or relay when GPS coordinates go outside a defined zone
- Speed Trap Display — Show real-time speed on an OLED or TFT screen
- Smart Clock — Use GPS UTC time as an ultra-accurate time source (no RTC needed)
- Boat Navigation Aid — Display coordinates and heading on a screen
- Search & Rescue Beacon — Log last known position before communication blackout
For deeper integration and sending GPS data to the cloud, you can explore MQTT protocol with Arduino and push coordinates to a broker for real-time web dashboards.
Common Mistakes and How to Fix Them
| Problem | Likely Cause | Fix |
|---|---|---|
| No data in Serial Monitor | TX/RX pins swapped | Swap the TX→RX and RX→TX connections |
| Garbled/garbage output | Baud rate mismatch | Make sure both gpsSerial.begin() and Serial Monitor are at 9600 |
| Module powered but no fix | Indoors/no sky view | Move outside or to a window |
| Fix works outside, not inside | Weak signal indoors | Use an active external antenna with SMA connector |
| Coordinates frozen/wrong | Library not parsing correctly | Re-check gps.encode() is receiving data in the loop |
| Module not detected | Bad solder joint or loose wire | Recheck connections, use multimeter on VCC/GND |
Using NEO-6M with Arduino Nano and Arduino Mega
Arduino Nano: Same wiring as Uno. Use SoftwareSerial on any available digital pins. Pin 4 (RX from GPS TX) and Pin 3 (TX to GPS RX) work well. Power from the 5V pin.
Arduino Mega: The Mega has three extra hardware serial ports. Wire GPS TX to Mega pin 19 (RX1) and GPS RX to Mega pin 18 (TX1), then use Serial1 instead of SoftwareSerial. This is the most reliable way to use the NEO-6M GPS module with Arduino Mega for high-frequency or mission-critical projects.
For further reading on SoftwareSerial limitations, the Arduino official documentation explains baud rate restrictions clearly.
Power Considerations
The NEO-6M GPS module with Arduino draws approximately 45 mA during normal operation. For battery-powered projects:
- A standard 9V alkaline battery through the Arduino’s barrel jack will last roughly 4–6 hours
- A 3.7V 2000mAh LiPo with a 5V boost converter will last 10–15 hours
- Using the module’s power-save mode (via UBX commands) can reduce consumption significantly for intermittent logging use cases
Where to Buy the NEO-6M GPS Module
The NEO-6M GPS module with Arduino compatible breakout boards are widely available:
- AliExpress — cheapest option, 2–4 week shipping
- Amazon — faster delivery, slightly higher price
- Robu.in, Evelta, Electronicscomp (India) — for Indian buyers with fast local shipping
Always verify the listing includes the ceramic patch antenna with the IPEX connector, as some cheaper listings ship the bare module without it.
10 Frequently Asked Questions
Q1. Does the NEO-6M GPS module with Arduino work indoors? Rarely, and only near large windows with a clear view of the sky. GPS signals are extremely weak and cannot penetrate walls, roofs, or heavy cloud cover reliably. For indoor positioning, you’d need a different approach like Wi-Fi triangulation or UWB.
Q2. How long does it take to get a GPS fix with NEO-6M? Cold start (first power-on or after long off time) typically takes 27–45 seconds in open sky. Hot start (powered off briefly with almanac still in EEPROM) takes about 1 second. The blue LED blink confirms a fix.
Q3. Can I use the NEO-6M GPS module with Arduino Nano? Yes, absolutely. The wiring is identical to Arduino Uno. Use SoftwareSerial on pins 3 and 4 and power the module from the 5V pin on the Nano.
Q4. What library should I use for the NEO-6M GPS module with Arduino? TinyGPS++ by Mikal Hart is the best choice. It’s actively maintained, lightweight, and handles all NMEA sentence parsing automatically. Install it through the Arduino Library Manager.
Q5. What is the accuracy of the NEO-6M GPS module? The NEO-6M GPS module with Arduino offers approximately 2.5 meters CEP (Circular Error Probable) accuracy under open sky. This means 50% of readings fall within 2.5 meters of the true position. This is sufficient for vehicle tracking, hiking, and general location projects.
Q6. Can I use two GPS modules on the same Arduino? Yes, using multiple SoftwareSerial instances on different pin pairs. However, SoftwareSerial can only actively listen to one port at a time, so you need to call listen() on the appropriate instance before reading. On an Arduino Mega, using multiple hardware serial ports is much cleaner.
Q7. Why is the NEO-6M GPS module with Arduino giving wrong coordinates? Check if gps.location.isValid() returns true before printing. Also make sure you’re running the code in open sky conditions. If the module shows coordinates but they’re drifting, you may have a weak signal — move away from buildings and RF noise sources.
Q8. Can I connect the NEO-6M GPS module to ESP32 or ESP8266 instead of Arduino? Yes. The NEO-6M GPS module works with any microcontroller that has a UART interface. On ESP32, use Serial1.begin(9600, SERIAL_8N1, RXpin, TXpin). On ESP8266, use SoftwareSerial the same way as Arduino. The TinyGPS++ library works on both platforms.
Q9. What does the blue LED on the NEO-6M breakout board indicate? The blue LED (labeled “PPS” — Pulse Per Second) blinks once every second when the module has acquired a GPS fix. If it blinks rapidly or stays solid, the module is searching for satellites. If there’s no LED activity, check your power connections.
Q10. Is the NEO-6M GPS module still relevant in 2026? Absolutely. The NEO-6M GPS module with Arduino remains one of the best entry-level GPS solutions for hobbyists and students. While newer modules like NEO-M8N offer multi-constellation support, the NEO-6M GPS module’s price point, availability, and the massive community support around it make it the first choice for beginners and even many professional prototypes in 2026.
Final Thoughts
The NEO-6M GPS module with Arduino is one of those components that genuinely changes what your projects can do. Once you get that first set of coordinates printing in your Serial Monitor — taken from satellites thousands of kilometers above the Earth — it’s hard not to feel the potential of what you can build.
Start with the basic wiring and the code in this guide. Get a fix, confirm your coordinates on Google Maps, and then branch out into logging, tracking, or geofencing. The foundation you build with the NEO-6M GPS module with Arduino transfers directly to more advanced GNSS modules when you’re ready to scale up.
For official documentation on the NMEA protocol used by the NEO-6M GPS module, you can refer to the NMEA 0183 standard overview and for u-blox protocol specifics, the u-blox NEO-6 hardware integration manual is the definitive resource.
Happy building.
1 thought on “How to Use NEO-6M GPS Module with Arduino (Complete BEST 2026 Guide)”
Comments are closed.